top of page
Sketchbook Work
This page is to show what's going on inside my sketchbook (this book is for my FMP, final major project) I have taken photos of my sketchbook, to show my thinking process and how I got to where I am now. I haven't taken photos of every single page, however I've taken photos of the main pages that will show useful information about my work.
 This is the first page of my sketchbook. I decided to draw a creepy face with a title " Why Would You Want To Feel Scared?" I find it important for the first page to show what the whole project is about. |  In this page I'm looking at the reasons why do we like to feed scared. The reasons are - The safety net: so many of us are actually seeking "controlled" fear and suspense, cause we know we are safe. Self Satisfaction: some people love to pus their limits and seeing how much they can tolerate. Closeness With Others: horror movies are great for first dates- for closure to one another. Curiosity: Many people are curious about the dark side, people like to make their worlds make sense. |  Here I was looking at the scientistic reason behind us enjoying to scare others. - The desire to frighten someone, is a product of society obsessed with sensationalism has became a currency, a way to impress yourself and feeding your personal ego. page 5 is about why do we watch real videos of people dying?- its not for grossing people out but for documenting and observing the disturbing reality of death. |
|---|---|---|
 In this page I was looking at the QUIJA board and I was looking at the story of when it first came out and when people started to realise that it's bringing ghost to their house and loved ones are dying. Page 7 is going back to the page 5 where I talked about why do we like to watch videos of people dying- I needed to show some photos of what kind of videos I mean (these images are all real, however they are from google and don't show faces of the victims) |  I picked out 5 horror movies to talk about and show the graphic scenes in them. I picked- Hereditary, Thirteenth ghost, Final Destination, Wrong Turn and Midsommar. I spoke a little bit about the movies and ten ive taken screenshots of the gory parts. | 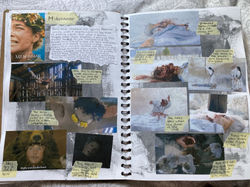 Here I was looking at Midsommar. I chose to pick this movie because its the most bloodiest and the SFX in it is amazing! |
 this page is photos from a trip that me and my class went too. I saw a few sculptures which related to me. |  Here I went to another trip with my college to see old buildings and houses, which reminded me of torture and witches. So I started to look like different torture's that were used. |  Types of tortures that I looked at was - Pear of Anguish, The Rack, Dunking, The Judas Cradle, iron Maiden, The Iron Chair, Saw Torture, Knee splitter and The Brazen Bull. page 23 I have photos rom the Science Museum |
 going to the science museum was something I needed to do for my primary source. looking at what's underneath human bodies and how it all looks like. | 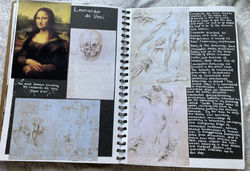 Here I decided to look at Leonardo Da Vinci, because I started to look at whats underneath our skin, Leonardo da Vinci came into that category because he dissected human body so he can draw/paint the perfect painting. |  In here I started to look at How do we read facial features? so for example an Oval face- expresses a character somewhat balanced, sweet, charming, in which case those are the best diplomats. Heart face- people with heart shaped faces do indeed have a lot of heart, are very creative, have strong intuition. Yet can be a little bit pushy |
 Here I carried on looking at how do we read facial features. so I started to look at hair colours, for example Blonde hair - is showing physical weakness and indifference, reflects youth. then I looked at different ear size. Small ears - show honour manners and affection ect . Then I looked at different sized forehead and eyebrows. |  Then I looked at different eye colours. Green Eyes - are all about nature, healthy living. Then I looked at different size noses, for example Straight Well-Formed Nose - shows patience, kindness, elegance and power to endure. lastly I looked at Lips, so Thick Lips - shows available pleasure, loving character but undecided. |  I researched the Chapman Brothers, because their work is very odd and creative. then page 34 I looked at Coronavirus, because its a deadly new virus which is killing people around the world. I'm looking at death and fear, So I thought what if all the people that have passed away, aren't dead and that in time they will come out from the ground and wonder about on the earth as a zombie. |
 Ebola, was another deadly virus, so I researched more about it and how many people were affected by it. I remember the first time I heard about it, it created fear. Page 36 I looked at dead body, it was important for me to research it, since when my main focus is death. I needed to know how it looks like and what happens to the body. |  I started to research a famous SFX artist called Howard Berger. Berger created costumes for the Walking Dead. |  page 39 is some of Howard Berger's work. Page 40 is about another SFX make up artist called Rob Bottin. |
 I looked at a book called "Making faces- Playing God, identity and the art of transformational make up" I chose this book because it shows me more information on how to create a zombie. |  the first page gave me my idea to how I could possibly make the body to my sculpture. Page 44, I looked at Why do we do it? well.... We like to feel in control of another persons feelings, it makes us feel powerful. We get pleasure and excitement from it. |  This page I was looking at Hubris. Hubris is arrogance or excessive pride, often leading to a persons downfall. then I looked at Eschatology - which is the resurrection of death, often these notions are contrasted with the experience of suffering in the world. Then I looked at Thanatos - Thanatos is personification of death. |
 Here I'm talking about what would I need for my final idea and how I want it to look and what it will be. Page 50 I started to draw out how I want my sculpture to look. These are all of my drawings, I just drew them on my iPad |  some more of my sketches | 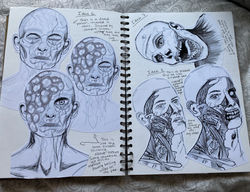 Some more of my drawing ideas. |
 some more of my drawings, however this one is my final idea, the drawing is very simple however I can imagine how it will look like. |  I went to the V&A to see the Tim Walker exhibition, which was amazing, it also made me start to think of how I will present my work at my exhibition |  Some postcards that I brought at the Tim Walker exhibition. Page 60 is my final sketch of how I want the body to look like. Although the arms won't look like that. |
 Page 61 I talk about how I'm going to make my sculpture, so step to step of my process. Page 62 is different ways of using the stand to make the sculpture |  So these are photos that I took of my work, they show my step by step process. I didn't post all of them, because ive posted my whole process. |  Some more photos. I found it hard to work to the size of a skull, because it just felt very small in-comparison with my previous work |
 |  |  So here I took equipment back home, due to the coronavirus. |
 I felt quite unmotivated because I just couldn't see it working. I tried over and over again many times, it just wasn't working. I realised that the problem was is that the face was too long and skinny. Here I started to make the body, putting a metal pole through the body of the mannequin |  I started to get somewhere and I was liking where I was going. For some reason in this project Ive struggled a lot with eyes. Here I started to create the cuts around the mouth. |  I started to create the cut around/on the nose. Then I realised that if the skin was taken off on the nose, the only thing that would be left is the bone and two holes. |
 In this page I made the ears, but then I decided to have the ear ripped. After I used this skin texture rolling tool all over the face and the head. Then I used thin plastic to get more skin texture, like long wrinkles. |  Page 99, I have a little silicone piece stuck in which is a colour tester. I need to practice first before I apply it to the real thing. My aim is to make my sculpture as realistic as I can. |  Here I'm showing the step by step process of casting an arm. |
 Here I was in the process of casting an arm and putting the silicone in. The process of putting the silicone in, as I had a few errors. |  Here I am showing the process of colouring. I started off with blue I used a sponge and I dabbed the paint on. Then I used red and dabbed it on. |  Here I'm showing how I made my character, scarier which is using red and blood. |
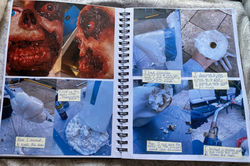 It was quite complicated to make holes through silicone and expanding foam, so I had to burn a rod and as it was hot I pierced it through, which then allowed me to connect the arm | 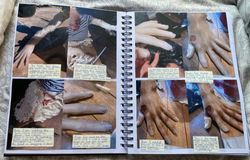 In these pages I started to create the tones on the arms, Ive never coloured hands before, so I am trying my best to make it look realistic. |  Some areas didn't work how I wanted them too, so the only option is to improvise. One of the fingers didn't work, expanding foam didn't reach to it, so I cut it off and now its an injured finger. The top of the arm didn't work well, the expanding foam didn't expand so I acted as if its an injured arm. |
 Here I'm showing the final thing, how it looks like in the end. |  In this page I'm showing all of the photos that I took of the sculpture. |  I needed to make sure that the photos would be in good quality and that the set up was good. |
 I took photos at the back of my garden, I covered my sculpture in mud because a zombie isn't clean. I also needed to make sure that it created the illusion that its coming out from the ground. |  I took photos during the day and during the night, which creates a different atmosphere. |  I chose 16 photos as my final photos. I only decided to post a couple. This page is me showing the Before and after of my editing. |
 I took photos from different angles so I can get the perfect photos. | 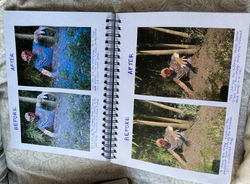 Just some more photos of y before and after. It is important to edit the images because, because they need to be up to the standards |  I took some photos through a cobweb, which looked kinda cool. it gave it more of a creepier look |
 It was important total photos from behind , to show how the guts looked like. The mud completed the look, it made the guts look more realistic. | 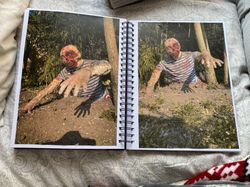 here I just printed out A4 sized photos of my final edits and stuck them in. To show in full size how they looked like in the end. |  Not all of the images looked clear in the end, they would look quite blurry, but ive tried my best to edit them so they look more better |
 These are the proper close ups that I took, love these images. |  The last photo is my photo, I love the angle, the colour.. everything! Page 163 is my final evaluation of the whole process, how I found it, if I had any errors, if covid 19 ruined any plans of mine. In total, I think this project couldn't of gone any better! |
bottom of page